

Tabby has become a game-changer for e-commerce stores in the UAE and other GCC countries, offering seamless buy-now-pay-later (BNPL) solutions. With Tabby, merchants can provide flexible, interest-free payment plans to their customers, boosting sales and reducing cart abandonment rates.
At DWB (Dubai Web Design), we specialize in creating state-of-the-art e-commerce websites, tailored to meet the needs of businesses across the UAE. Our expertise ensures seamless integration of tools like Tabby, enabling your store to stay competitive in the rapidly evolving market.
This article will guide you through the process of integrating the Tabby payment gateway into your WooCommerce store and highlight the benefits of using Tabby for your business.
Why Choose Tabby for Your Online Store?
- Flexible Payments: Tabby allows shoppers to split payments into interest-free installments, making online shopping more affordable and reducing reliance on cash-on-delivery.
- Enhanced Customer Experience: With a high net-promoter score (81), Tabby is known for its shopper-friendly approach.
- Wide Market Presence: Operates across Saudi Arabia, UAE, Kuwait, Bahrain, and Egypt.
- Secure and Compliant: Tabby is Shari’ah-compliant, PCI DSS certified, and licensed by the Saudi Central Bank.
- Traffic Growth: By integrating with Tabby, merchants benefit from co-marketing campaigns that drive traffic to their stores.
- Seamless Integration: Tabby is supported on websites, in stores, and on mobile apps.
Step-by-Step Guide: Adding Tabby Payment Gateway to WooCommerce
1. Install and Activate the Tabby WooCommerce Plugin
To start, you need the official Tabby plugin installed on your WooCommerce store.
- Go to your WordPress dashboard.
- Navigate to Plugins > Add New.
- Search for “Tabby Checkout”
- Click Install Now and activate the plugin once installed.
2. Configure API Keys
Tabby uses API keys to establish a secure connection between your WooCommerce store and the Tabby platform.

- Go to WooCommerce > Settings > Tabby API.
- Enter your Public API Key and Secret API Key provided by Tabby.
- Save the settings.
💡 Tip: Use the provided testing API keys during the integration phase to ensure everything works before going live.
3. Enable Tabby Payment Gateway
- In the WooCommerce settings, navigate to the Payments tab.
- Locate the Tabby payment method and click Enable.
- Save your changes.
4. Test the Integration
Before launching, perform a test transaction using Tabby’s sandbox mode:
- Add a product to your cart and proceed to checkout.
- Select “Tabby” as your payment method.
- Complete the payment using the testing credentials provided by Tabby.
- Verify the order appears correctly in your WooCommerce dashboard.
5. Go Live
Once testing is complete, switch to live mode:
- Replace the sandbox API keys with your live API keys in the Tabby API settings.
- Save the changes.
How to Retrieve Tabby API Keys for WooCommerce Integration
To successfully integrate Tabby into your WooCommerce store, you will need your Public API Key and Secret API Key. These keys are essential for authenticating and enabling transactions between your WooCommerce store and Tabby. Here’s how to obtain them:
Step 1: Sign Up or Log In to Your Tabby Merchant Account
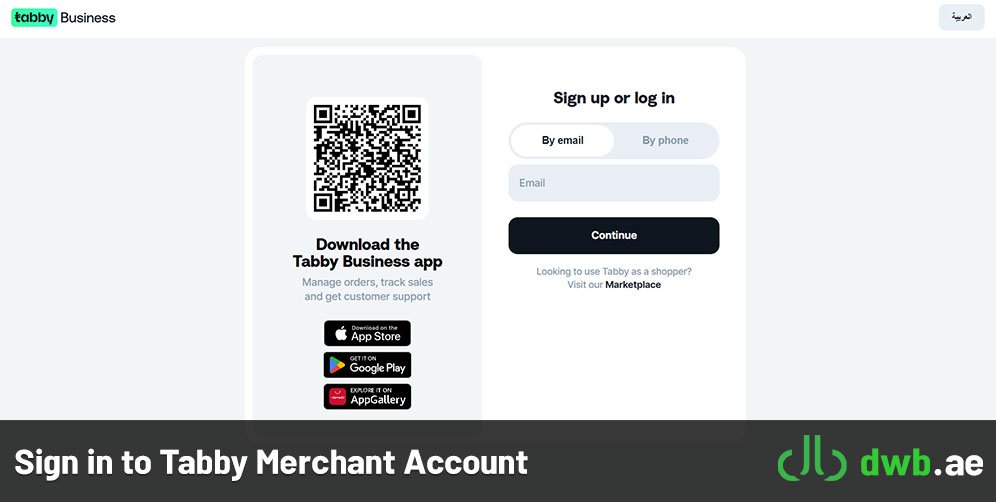
- Visit the Tabby Merchant Portal.
- If you don’t already have an account, click Sign Up and complete the registration process by providing your business details.
- If you already have an account, simply log in using your credentials.
Step 2: Navigate to API Settings
- After logging in, click on Settings in the left-hand menu of the Merchant Portal.
- Select the API Keys section from the available options.
Step 3: Generate or Retrieve API Keys
- If you don’t see existing API keys, click Generate New API Keys.
- Two keys will be provided:
- Public API Key: This is used for identifying your store.
- Secret API Key: This is used for secure transactions. Keep this key confidential and do not share it publicly.
- Copy both keys to a safe location, as you’ll need them for configuring the plugin in WooCommerce.
Step 4: Test or Live Environment Keys
- Ensure you are generating the correct API keys for the environment you intend to use:
- Testing: Use the keys under the Sandbox/Testing Environment section for initial integration and testing.
- Live: Once the integration is tested and ready, use the keys under the Production Environment section for live transactions.
Benefits of Using Tabby for WooCommerce
- Higher Conversion Rates: Flexible payment options encourage shoppers to complete purchases instead of abandoning their carts.
- Increased Average Order Value: Shoppers tend to spend more when they can pay in installments.
- Secure Transactions: Tabby ensures secure and PCI-compliant transactions for all payments.
- Reduced COD Dependency: Offering Tabby as a payment method reduces the reliance on cash-on-delivery, which often leads to canceled orders.
- Loyal Customer Base: Tabby’s seamless shopping experience fosters customer satisfaction and repeat purchases.
Conclusion
Integrating the Tabby payment gateway into your WooCommerce store not only simplifies the checkout process but also enhances the shopping experience for your customers. Tabby’s flexible BNPL solutions help you increase sales and gain loyal customers.
At DWB (Dubai Web Design), we can assist you in setting up Tabby and other essential e-commerce tools to optimize your online store for success. Whether you’re launching a new store or upgrading your existing platform, our team is here to help you every step of the way.
Stay ahead of the competition and elevate your online business by integrating cutting-edge solutions like Tabby with the support of DWB. Let us turn your e-commerce goals into reality!