


WordPress is an amazing content management system, but without adhering to optimization principles and speeding up WordPress, a website created with this CMS may load slowly. This decrease in speed leads to a lower ranking on Google and, in other words, results in a drop in your site’s SEO.
So, your question might be: how do we increase the speed of a WordPress site?
In this article from Persia Web, we try to comprehensively teach you how to increase the speed of WordPress in a simple yet professional language.
Using an Optimized Theme
Behind every WordPress website, there is a theme or framework that may not be optimized or stable. In coding, everyone has their preferred method, and if you’re not a developer, it’s recommended to use a stable and optimized theme. Currently, simple themes like the WordPress Twenty Seventeen theme are one of the best recommendations for you, as they are not only simple but also very lightweight.
Also, note that you can purchase reputable themes from trustworthy stores. Just be aware that, even though there are many themes available on the web, some developers take advantage of the trust of stores and earn high income by adding a few features to a simple theme. In any case, our recommendation for buying a WordPress theme is not Persian-language stores, and it is also not possible to evaluate the speed of the site based on the theme demo.
Using Caching
Enabling caching on your WordPress site is another crucial factor in increasing site speed. Caches are static files generated from your pages and articles that are stored in users’ browsers, reducing the load time of your website for subsequent visits. You can achieve this by using WordPress caching plugins, browser caching, and server caching.
Nevertheless, we provide a brief solution for WordPress sites using plugins or code in the continuation of the article.
WordPress Cache Plugins
Here, we introduce you to several free and premium WordPress cache plugins:
- Cache Enabler Plugin
- W3 Total Cache Plugin
- WP Super Cache Plugin
- WP Rocket Plugin
Browser Cache – Adding Expire Headers to WordPress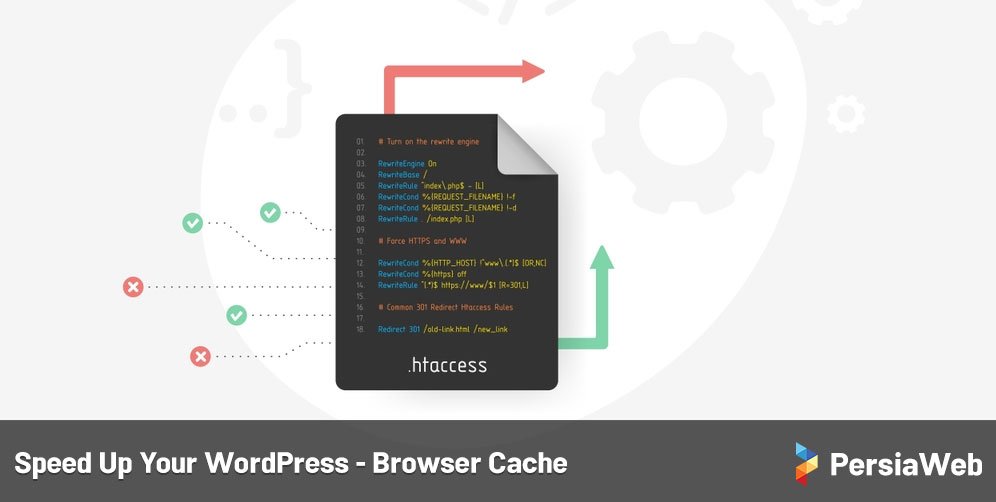
Most websites are dissatisfied with the inactive Leverage Browser Caching on their web server. By adding the following code snippet to the htaccess file, you can enable browser caching for your website. This feature is also available in some of the recommended plugins mentioned above. Code:
<IfModule mod_expires.c>i
# Enable expirations
ExpiresActive On
# Default directive
ExpiresDefault "access plus 1 month"
# My favicon
ExpiresByType image/x-icon "access plus 1 year"
# Images
ExpiresByType image/gif "access plus 1 month"
ExpiresByType image/png "access plus 1 month"
ExpiresByType image/jpg "access plus 1 month"
ExpiresByType image/jpeg "access plus 1 month"
# CSS
ExpiresByType text/css "access plus 1 month"
# Javascript
ExpiresByType application/javascript "access plus 1 year"
</IfModule>
Server-Side Caching
Alongside WordPress plugins and browser caching, servers can also utilize caching settings. For instance, Varnish cache is one of the powerful options when combined with a CDN.
Utilizing Prefetch for Popular Domains In this method, you create a setting in your website’s DNS for prefetching parts of your website, such as well-known JS files that users commonly encounter on most websites. This helps load this section of the website much faster when users enter the site.
To use Prefetch in WordPress, you need to add a syntax example in the Header.php file between the <head> and </head> tags. For example, consider the following examples:
Using Prefetch for Google Fonts:
<link rel="dns-prefetch" href="//ajax.googleapis.com">Using Prefetch for Google Script Files (JQuery):
<link rel="dns-prefetch" href="//www.google-analytics.com">Removing Query Strings from Static Resources
Removing query strings from your website’s static resources is beneficial as it prevents potential issues on the website.
- Open the functions.php file and add the following code inside it:
function _remove_script_version( $src ){

$parts = explode( '?ver', $src );

return $parts[0];

}

add_filter( 'script_loader_src', '_remove_script_version', 15, 1 );

add_filter( 'style_loader_src', '_remove_script_version', 15, 1 );- If you are using plugins like WP Rocket, there is no need to apply these settings manually, as these plugins handle it automatically.
- You can also install plugins like Query Strings Remover and Remove Query Strings From Static Resources in your WordPress.
If you are using a CDN, your CDN may have a feature for removing queries. Refer to your CDN’s documentation to learn more about this feature.
Using Content Delivery Network (CDN)
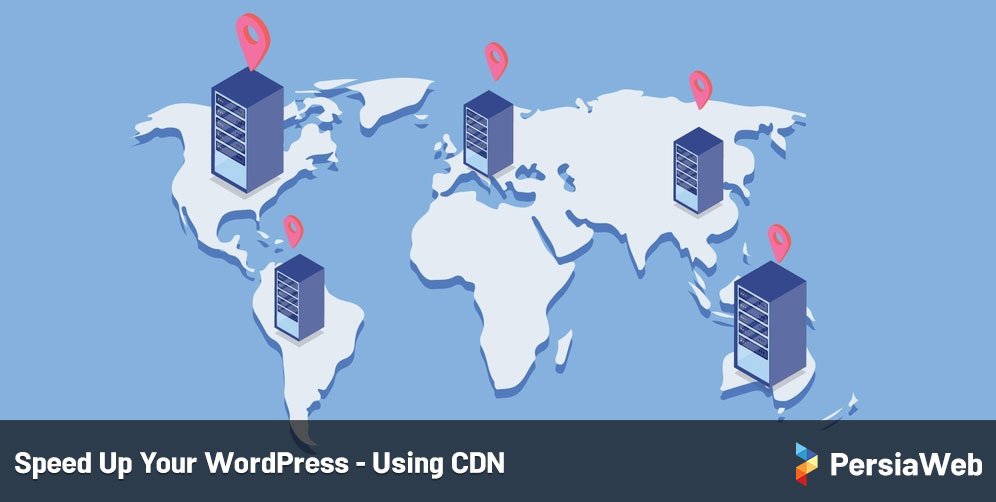
If you’re unfamiliar with CDN, make sure to read the article “What is CDN” for a comprehensive understanding. Regardless of how heavy your WordPress website is or how much traffic it currently consumes, all these issues can be resolved with a CDN service. A CDN service shares all your JS, CSS, and image files from its cloud servers globally to serve users, providing them with an exceptionally fast experience and reducing file download time. We have extensively discussed the benefits of using CDN in a detailed post, and we’ve even published a tutorial on Cloudflare to help you easily implement CDN.
Connecting a CDN to your website not only boosts speed but also enhances your website’s conversion rate and reduces your Bounce Rate. (You might wonder, what is Bounce Rate? We’ve covered interesting topics about it in the article “What is Bounce Rate.” Make sure to check it out.) I’ve provided comprehensive explanations about CDN in the article “What is CDN and how to activate it.” If you intend to use Cloudflare CDN, I’ve also prepared an article about understanding and activating it in WordPress, which I recommend reading.
Loading All Files from CDN
Ensure that even the smallest files on your website, such as favicons, are hosted on the CDN. If all your website’s information is loaded from a CDN connection, your website’s speed will be multiplied.
To call the favicon from CDN in WordPress, modify the following code in the header.php file for your website and load it from the CDN.
<link rel="shortcut icon" href="https://cdn.domain.com/favicon.ico" type="image/x-icon" />For example, below, you can see that all website data is called from the CDN:
Optimizing the WordPress Database
If you don’t optimize the WordPress database, WordPress gradually begins to slow down over time. Various ways exist to maintain the database optimally, helping you limit post revisions and even disable them.
Disabling or Limiting the Number of WordPress Revisions
To address this issue, stay tuned with Persia Web.
Disabling Revisions
To disable revisions, you need to add the following code snippet to the wp-config.php file. This action changes the autosave interval from 60 seconds to 5 minutes and completely disables revisions.
define('AUTOSAVE_INTERVAL', 300); // seconds

define('WP_POST_REVISIONS', false);
Additionally, there is an incredibly simple and lightweight plugin in this regard that you can use on your website. The name of this plugin is “Disable Post Revision“.
Limiting Revisions
To limit revisions, you should place the following code snippet in the wp-config.php file. This action changes the autosave interval to 5 minutes and limits the maximum number of revisions to 3. You can adjust the number 3 to decrease or increase the number of revisions.
define('AUTOSAVE_INTERVAL', 300); // seconds

define('WP_POST_REVISIONS', 3);
Cleaning Old Revisions from the Database
After performing the revision limiting or disabling operations, it’s time to clean up old revisions. For this task, I recommend using the outstanding and free plugin Wp-Optimize.
With this plugin, you can delete all revisions of your website’s articles, automatically delete draft articles, clear all spam and unapproved comments. Additionally, in the latest versions of this plugin, you can perform all database optimization operations automatically. Don’t forget to backup before making changes to the database.
Getting Rid of the 100 Page Limit in WordPress
In general, WordPress websites are sensitive to the number of pages, and having more than 100 pages is generally considered unacceptable. If your website exceeds 100 pages, you’ll experience high memory consumption and a slowdown in the backend speed of your website. Note that these issues won’t affect the front end of your WordPress website, and it won’t have any impact in that area. Even Automattic itself mentions information about this in its documentation.
Considering that WordPress is designed for content-based websites, some people use this content management system for various purposes, such as corporate websites, due to the ease of use. These websites require multiple pages, and by adding pages, they encounter problems in the backend management of their website, experiencing high memory usage and reduced speed. For such websites, it is recommended to create multiple pages with a similar structure or create different Custom Post Types for different topics. You can also use the Post Type Switcher plugin to convert your pages into a different Custom Post Type, turning your pages into articles and resolving the slowdown issue in the backend.
Optimizing WordPress Images
Optimizing images and reducing their size is a complex topic that requires a thorough examination. At Meezfa, we have published comprehensive and user-friendly articles on SEO images, so be sure to carefully read those articles as the image section of WordPress is one of the most important and impactful parts of your website.
The smaller the file size of the images used on a page, the faster that page will load.
Enable Gzip Compression on Your Website
Another crucial part of optimizing a WordPress website is enabling Gzip compression. Activating Gzip compression reduces the size of web pages, CSS files, and JavaScript files. By enabling Gzip, you can save 50% to 80% of your website’s bandwidth.
Apache:
To enable GZIP compression in Apache, add the following code to the .htaccess file:
<IfModule mod_deflate.c>

# Compress HTML, CSS, JavaScript, Text, XML, and fonts

AddOutputFilterByType DEFLATE application/javascript

AddOutputFilterByType DEFLATE application/rss+xml

AddOutputFilterByType DEFLATE application/vnd.ms-fontobject

AddOutputFilterByType DEFLATE application/x-font

AddOutputFilterByType DEFLATE application/x-font-opentype

AddOutputFilterByType DEFLATE application/x-font-otf

AddOutputFilterByType DEFLATE application/x-font-truetype

AddOutputFilterByType DEFLATE application/x-font-ttf

AddOutputFilterByType DEFLATE application/x-javascript

AddOutputFilterByType DEFLATE application/xhtml+xml

AddOutputFilterByType DEFLATE application/xml

AddOutputFilterByType DEFLATE font/opentype

AddOutputFilterByType DEFLATE font/otf

AddOutputFilterByType DEFLATE font/ttf

AddOutputFilterByType DEFLATE image/svg+xml

AddOutputFilterByType DEFLATE image/x-icon

AddOutputFilterByType DEFLATE text/css

AddOutputFilterByType DEFLATE text/html

AddOutputFilterByType DEFLATE text/javascript

AddOutputFilterByType DEFLATE text/plain

AddOutputFilterByType DEFLATE text/xml
  # Remove browser bugs (only needed for really old browsers)

BrowserMatch ^Mozilla/4 gzip-only-text/html

BrowserMatch ^Mozilla/4\.0[678] no-gzip

BrowserMatch \bMSIE !no-gzip !gzip-only-text/html

Header append Vary User-Agent

</IfModule>
Nginx:
To enable GZIP compression in the NGINX web server, add the following code to the nginx.conf file:
gzip on;

gzip_comp_level 2;

gzip_http_version 1.0;

gzip_proxied any;

gzip_min_length 1100;

gzip_buffers 16 8k;

gzip_types text/plain text/html text/css application/x-javascript text/xml application/xml application/xml+rss text/javascript;

gzip_disable "MSIE [1-6].(?!.*SV1)";

gzip_vary on;
Reducing the Number of Plugins in WordPress
One common reason for slow website speed is having too many active plugins on your WordPress site. Try to use the minimum number of active plugins possible. Before disabling and removing plugins, analyze them to see which ones are affecting the website’s loading speed.
After the analysis, try to resolve the issues caused by the plugins. If you can’t solve the problem, consider deactivating or removing them.
P3 Plugin:
The P3 plugin is a free plugin developed by GoDaddy to help you solve the issue of your website’s slow loading speed. With this plugin, you can:
- Determine the execution time of each plugin.
- Obtain a list of all active plugins and their respective loading times.
- Identify which plugins are causing your website’s speed to decrease.
- Count the queries in MySQL.
- Generate tables of scan results.
Note: This plugin is currently not compatible with PHP version 7.
Optimizing Web Font Performance
In recent studies on web performance, it has been found that approximately 57% of websites use custom fonts, and this number has increased by about 850% from 2011 to now.
SEO experts believe that webmasters should only load the necessary formats on their websites, such as WOFF and WOFF2. Services like Typekit, due to base64 encoding, increase download time and decrease the speed of your website.
In our tests, Google Fonts, when using a CDN, only use the Woff format, providing exceptional speed. Open Sans font has been the fastest among the top 10 Google fonts. If you want exceptional speed in fonts, it is recommended to use a combination of Open Sans and Arial on your website.
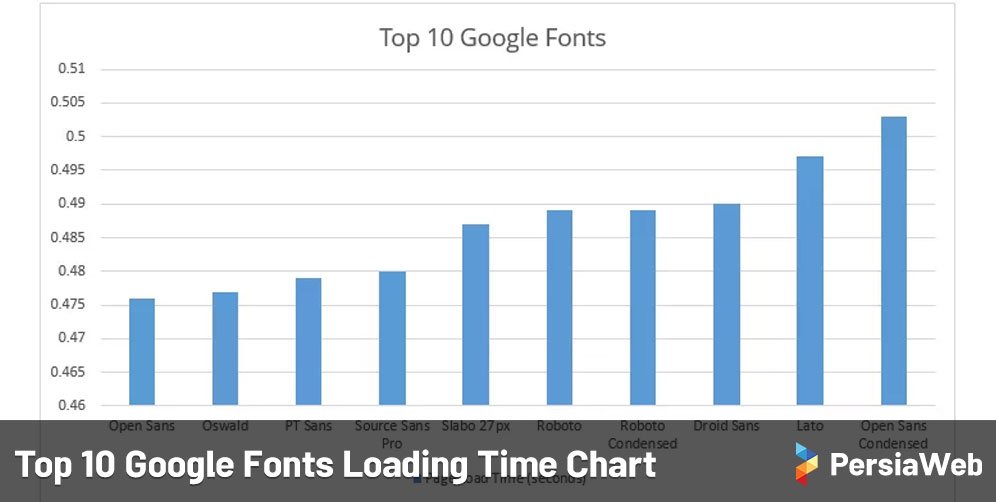
The speed difference in loading fonts, for example, between secure web fonts and Google fonts, is approximately 200 milliseconds. Also, keep in mind that loading fonts in Google adds additional requests to your HTTP requests.
Another thing you can do in this regard is to transfer font files to a CDN. Most CDN providers offer a section for their users to add links to the most popular CSS and Js structures through the CDN.
Note that you can add these sections to the browser cache section so that once the user downloads it, there is no need to download the file again, and the speed of your website increases.
We recommend using the LocalFont Tool to convert WOFF fonts to Base64 encoding structure. This will provide you with a CSS file and a JavaScript file, allowing you to increase loading speed.
Lazy Loading for Images, Videos, and Comments
Lazy loading is currently one of the most debated sections of website optimization. After enabling lazy loading on your WordPress, the website loading time generally improves by 1 to 10 seconds, especially on article-focused pages.
Here are 2 plugins for lazy loading in WordPress:
-
a3 Lazy Load:
- Link: a3 Lazy Load
- Description: This plugin provides lazy loading for images, videos, iframes, quotes, and other elements. It comes with extensive settings for more precise control over lazy loading.
-
Lazy Load:
- Link: Lazy Load
- Description: This lightweight and straightforward plugin automatically lazy loads images. Installation and activation are quick and easy.
Combining and Minifying HTML, CSS, and JavaScript Files
When talking about optimization, the combination and minification of files play a significant role. However, it’s essential to note that minification is different from combination, and we will discuss this further below.
Minification: Minification involves cleaning up extra parts in HTML, CSS, and JavaScript files. Examples of these extra parts include comments, spaces, lines, and separator blocks. By removing these parts, you can increase your website’s loading speed.
If you are using the WP Rocket plugin, you can activate Minify within it. Additionally, the Better WordPress Minify plugin is an excellent option in this regard.
Combining Files (Concatenate)
Combining files means merging multiple CSS and JavaScript files into one file, reducing HTTP requests. In most cases, this increases the download time of files but helps avoid additional HTTP requests.
If you are looking for a free plugin, you can use the Merge + Minify + Refresh plugin, which is not only free but also allows file minification.
Reducing Mutual HTTP Requests
Reducing the number of HTTP requests in WordPress is crucial for optimizing website performance. Below, we address how to decrease the number of additional requests in WordPress.
Gravatars
If you use the default WordPress comment system, user profile images are loaded through Gravatars by default. Each image load through Gravatars adds an HTTP request for each page request. If your website has a high number of comments, this can significantly reduce speed and increase the number of HTTP requests.

Solutions:
1- Deactivate Gravatar:
The first solution is to disable fetching user image data from Gravatar and use a local provider instead. While not ideal, prioritizing the ideal user experience achieved through exceptional website speed is crucial.
To implement this, you can use a free plugin called “WP User Avatar,” allowing users to easily upload their images to your website’s core. Additionally, in the settings section, you can click on “Disable Gravatars and use only local avatars” to completely deactivate Gravatars.
2- Lazy Loading
Lazy loading does not reduce the number of HTTP requests, but it improves website speed by loading Gravatars at specific times. To activate lazy loading in the WordPress comments section, refer to the related article for more details.
Deactivating Emojis
After the release of WordPress version 4.2, emojis became usable in WordPress. Unfortunately, this added an extra JavaScript file called wp-emoji-release.min.js?ver=4.3.1, leading to an additional HTTP request.
Solutions:
- Install a Plugin: You can use a free plugin called “Disable Emojis” developed by Ryan Hellyer to completely deactivate emoji functions added to WordPress.
- WordPress Function Code: If you prefer to disable emojis without using a plugin, you can add the following code to your theme’s
functions.phpfile:
/**

* Disable the emoji's

*/

function disable_emojis() {

remove_action( 'wp_head', 'print_emoji_detection_script', 7 );

remove_action( 'admin_print_scripts', 'print_emoji_detection_script' );

remove_action( 'wp_print_styles', 'print_emoji_styles' );

remove_action( 'admin_print_styles', 'print_emoji_styles' );

remove_filter( 'the_content_feed', 'wp_staticize_emoji' );

remove_filter( 'comment_text_rss', 'wp_staticize_emoji' );

remove_filter( 'wp_mail', 'wp_staticize_emoji_for_email' );

add_filter( 'tiny_mce_plugins', 'disable_emojis_tinymce' );

}

add_action( 'init', 'disable_emojis' );
/**

* Filter function used to remove the tinymce emoji plugin.

*

* @param array $plugins

* @return array Difference between the two arrays

*/

function disable_emojis_tinymce( $plugins ) {

if ( is_array( $plugins ) ) {

return array_diff( $plugins, array( 'wpemoji' ) );

} else {

return array();

}

}
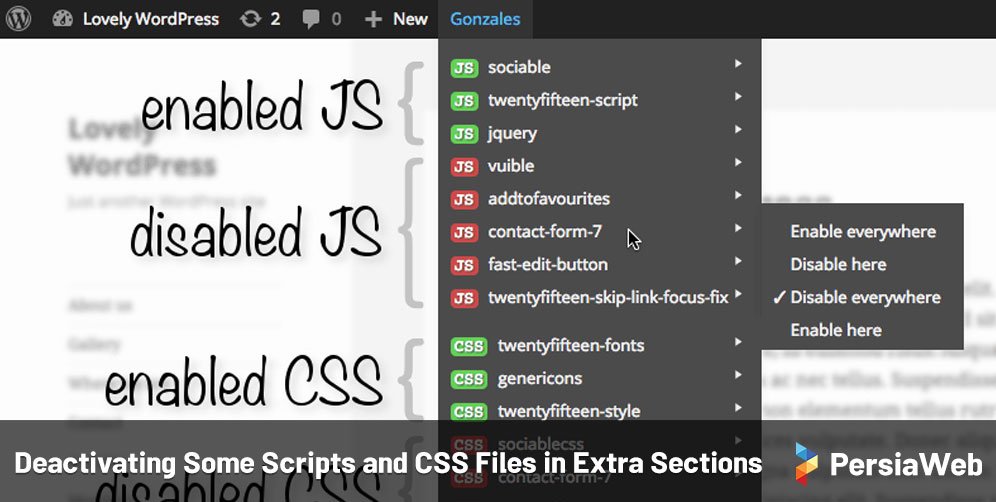
Deactivating Some Scripts and CSS Files in Extra Sections
In a typical scenario, when you create multiple plugins on your website, their JavaScript and CSS files load in all sections of your website, reducing website speed. A commercial plugin called “Gonzales” has addressed this issue, allowing you to load only the necessary plugins on your website and deactivate additional sections. By doing so, you can significantly increase the speed of your website, especially for large websites with multiple plugins.
Disabling Embeds
In WordPress 4.4, a new script called wp-embed.min.js was added to WordPress scripts. This script allowed easy embedding of images, videos, tweets, and other shareable structures on websites. For instance, when you inserted a link to a YouTube video in the visual editor of WordPress, it automatically converted it into a playable format on the website. While this script can be useful, it loads on all your pages, causing a significant slowdown unless you have the Gonzalez plugin.
To disable Embeds, try one of the following solutions:
Solution One – WordPress Plugin
There’s an excellent free plugin called “Disable Embeds,” developed by Pascal Birchler, which disables all loaded script codes on the page, making your website faster.
Solution Two – WordPress Function Code
If you prefer not to use a plugin and want to optimize using code directly, place the following code in your theme’s functions.php file:
// Remove WP embed script

function speed_stop_loading_wp_embed() {

if (!is_admin()) {

wp_deregister_script('wp-embed');

}

}

add_action('init', 'speed_stop_loading_wp_embed');
Disabling Comments
The comments section is both highly engaging and potentially risky. If not properly protected, it can even lead to a complete compromise of your website. The best suggestion for having a good feedback system is to use third-party systems like Disqus, which have fewer issues compared to the default WordPress commenting system. To disable WordPress comments, you can use the following code in the functions.php file of your theme:
// Remove comment-reply.min.js from footer

function comments_clean_header_hook(){

wp_deregister_script( 'comment-reply' );

}

add_action('init','comments_clean_header_hook');
Disabling Hot Linking
Hot linking refers to using the URL of an image uploaded by someone else rather than uploading the image yourself. This can lead to server load issues and bandwidth theft unless your server has unlimited bandwidth. To disable hot linking, you can either use the Hotlink Protection section in your cPanel or add the following code to your .htaccess file:
RewriteEngine on

RewriteCond %{HTTP_REFERER} !^$

RewriteCond %{HTTP_REFERER} !^http(s)?://(www\.)?yourdomain.com [NC]

RewriteRule \.(jpg|jpeg|png|gif)$ – [NC,F,L]
After disabling hot linking, images will display with a 403 error.
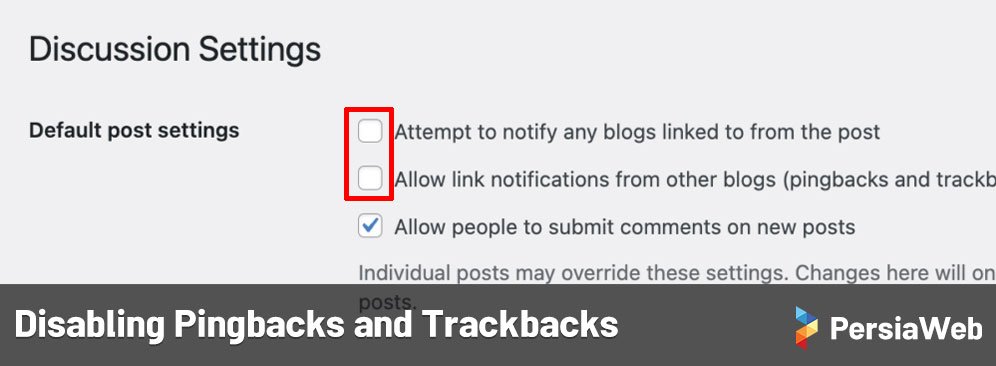
Disabling Pingbacks and Trackbacks
Pingbacks and Trackbacks can slow down your website. To disable them, go to the Discussion section of your WordPress site and uncheck the “Allow link notifications from other blogs (pingbacks and trackbacks)” option.
Disabling this option means not allowing other websites to ping back to your site.
Defining Image Dimensions
Most of you have likely encountered an issue with website analyzers regarding your image dimensions. This error pertains to specifying the dimensions of your images. For example, your main image might have a height of 500 pixels, but you haven’t indicated how many pixels this image actually has on the website. In this case, the browser is forced to take time to determine the dimensions of the images.
Slow Loading Fix for admin-ajax.php in WordPress
In WordPress 3.6 and later versions, the Heartbeat API is automatically used to connect and integrate web browsers and servers, aiding in automatic management and storage by WordPress administrators.
Within this API, there is an AJAX file named admin-ajax.php that communicates with the browser. This file is substantial and transfers heavy requests to the server. Consider that if you log out of your WordPress dashboard once and log in again, repeating this action can even lead to your WordPress server becoming slow to shut down. This is because, with each page refresh, this file sends a POST request to your WordPress.
The free plugin “Heartbeat Control” is designed to facilitate your management tasks, allowing you to control the frequency of POST requests made by the Heartbeat API and preventing your server from slowing down.
As shown below, without configuration by the mentioned plugin, this file adds approximately 500 milliseconds to your website’s loading time. By adding this plugin, your issue will be resolved.

Choosing a reputable web hosting provider is crucial for hosting your website
You should always opt for a hosting server that is secure and reputable. Additionally, it’s essential to consider that the chosen web hosting provides reliable optimization features for your website. Before purchasing any hosting, inquire about the hosting features and the access they provide to assess the websites currently using their services, checking factors like Time to First Byte (TTFB), etc.
Summary
We hope this article from Persia Web has been helpful for you. By selecting a good host, optimizing databases, implementing a CDN, compressing images, cleaning up code, and reducing the number of HTTP requests, you can have a high-speed website.